


What Is Parallax on a Rifle Scope? A Beginner’s Guide
If you're new to shooting with a rifle scope, you’ve probably heard the term “parallax” thrown around - but what exactly does it mean, and why should you care?
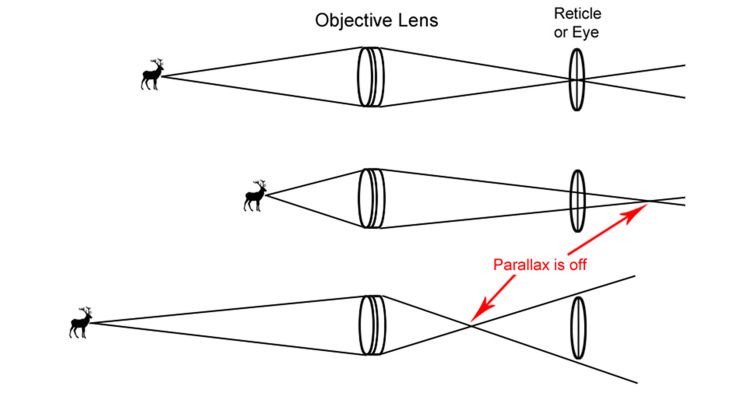
Parallax in a rifle scope refers to an optical effect that can make your reticle (the crosshairs or aiming point in your scope) appear to move across the target when you shift your head or eye position. When parallax is not properly adjusted, this small movement can lead to big accuracy problems - especially when shooting at longer distances or using higher magnification.
To help visualise this, think of your car’s speedometer. When you look straight at it from the driver’s seat, the needle points directly to the correct speed. But if a passenger looks at the speedometer from an angle, it might appear as though the car is going faster or slower than it actually is. That’s because their line of sight isn’t aligned with the needle and dial. This apparent shift in the needle’s position - despite nothing actually moving - is exactly what parallax is in a rifle scope. The same thing can happen in your scope if the image of the target and the reticle are not perfectly aligned on the same optical plane.
The good news is that many rifle scopes come with a parallax adjustment knob or ring, often labelled “AO (adjustable objective) or SF (side focus)” or marked with distance settings that let you fine-tune the focus to eliminate parallax at a specific range. Once the adjustment is dialled in correctly, the reticle stays locked on target, no matter how slightly your head shifts. This leads to more precise and consistent shooting.
In short, understanding and managing parallax can help you shoot more accurately and confidently. It might sound technical at first, but with a bit of practice, making this adjustment will become second nature - and your shooting will be better for it.
How parallax adjustment works.
To eliminate parallax-induced aiming errors, telescopic sights can be equipped with a parallax compensation mechanism, which basically consists of a movable optical element that can shift the target/reticle focus back or forward into the same optical plane.
Guide: How to Adjust Parallax
1. Set Up Safely and Securely
-
Mount the rifle so it doesn’t move — use a stable rest, bipod, or shooting bench.
-
Use a target placed at a known distance. If you expect to shoot at varied distances, try to start with a mid‑range target (e.g. 100‑200 yards/metres).
-
Set magnification to its maximum (zoomed in) if you have a variable power scope — parallax effects are easier to notice then.
2. Focus the Reticle (Dioptre or Eyepiece Adjustment)
-
Look through the scope at something plain and not the target yet — a blank wall, sky, etc.
-
Adjust the diopter / eyepiece focus so the reticle is crisp and sharp for your eye. This is very important, because even perfect parallax correction won’t help if the reticle itself is blurry.
-
Once that’s done, lock it or note the setting if there’s a diopter lock.
3. Identify Parallax Shift
-
With the rifle stabilized, look through the scope and move your head (or your eye) slightly side to side or up and down.
-
If the reticle moves over the target (i.e. shifts relative to the target), parallax is present. The goal is to reduce or remove this movement.
4. Use the Parallax Adjustment Mechanism
Depending on your scope, parallax might be adjusted via:
-
Side Focus / Side Parallax Knob: Typically found on the left side of the scope tube. Turn it to match the distance to the target.
-
Adjustable Objective (AO): A ring around the front (objective) lens that you rotate until the target and reticle come into focus together.
Use the markings on the knob or ring (they often have yardage or metre numbers) as a reference, but fine‑tune by sight (see if the reticle stops moving as you shift your eye).
5. Fine‑Tune Until the Reticle “Locks”
-
After adjusting, repeat the test: move your head/eye.
-
If the reticle no longer appears to move relative to the target, you’ve successfully reduced parallax.
-
If there’s still a bit of movement, make small adjustments — sometimes just a small tweak will make a big difference.
6. Note & Repeat for Different Distances
-
Once you’ve got the target distance you expect to shoot at (or often shoot at) dialled in, note the setting.
-
If you change target distance significantly (for example from 100m to 400m), repeat steps 3‑5 for that distance.
-
Always check at each new distance if you want precise aim.
Tips & Common Mistakes
-
Don’t skip the reticle focus step — people often try to adjust parallax first and neglect how a blurry reticle undermines everything.
-
Be gentle with your adjustments — knobs and rings are precise; tiny movements count.
-
Light conditions can affect how perceivable parallax is: bright light makes things sharper; low light makes everything a bit fuzzy and swirls in your eye more likely.
-
If your scope has no parallax adjustment (fixed parallax), it is usually optimised for a particular distance (e.g. 100 or 150 yards/metres). Outside that, parallax error is still possible but you’ll have to adapt (keep your eye well centred, etc.).
Final Thoughts
Understanding and adjusting for parallax might seem a bit technical at first, but it’s an essential skill for improving your accuracy—especially when shooting at longer ranges or with high magnification scopes. Parallax occurs when the reticle and the target image aren’t aligned on the same optical plane, causing the crosshairs to appear to move when you shift your eye position.
Modern scopes often come with parallax adjustment features, such as side focus knobs or adjustable objective (AO) rings, which let you fine-tune this alignment and eliminate aiming errors. By learning how to identify parallax and make the proper adjustments, you can ensure your point of aim stays consistent—no matter how slightly you move behind the scope.
For beginners, taking the time to practice these adjustments and understand how your scope works will pay off in better shot placement, greater confidence, and a deeper knowledge of your gear. Parallax correction isn’t just for long-range marksmen—it’s a valuable tool for any shooter who wants to make every shot count.